All tools described in this chapter are available in the Windows version of Aploris. Aploris for Mac currently supports Symbols and Harvey Balls, Send and save selected slides, Same height/width and Same bevel.
Aploris allows you to easily insert and update status marks and Harvey Balls on your slides.

The controls required to configure and insert those symbols are found in the Aploris ribbon group. For Aploris for Mac they are located on the floating Aploristoolbar in PowerPoint.
First select a color from the Color drop-down list. This color will be applied to all subsequently inserted symbols. You have the options to choose from colors defined by the current PowerPoint scheme, a list of preconfigured colors or choose None for transparent symbols. If another color is required select Custom. On Aploris for Mac choose Selected to use the color of the currently selected shape.
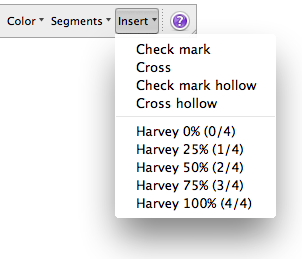
If you want to insert Harvey Balls you can flexibly configure the number of segments that make up a full Harvey Ball. Four segments are used frequently which means Harvey Balls can be filled by 0%, 25%, 50%, 75% and 100%. If you for instance switch to three segments, 0%, 33.3%, 66.6% and 100% fills will be available. You can also select Custom to specify any number between 2 and 100 (not available on Mac).
Now the drop-down gallery Insert Symbol or Insert on Mac can be used to insert a status mark or a Harvey Ball using the current settings.
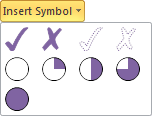
When you click on any of the symbols it will be inserted at the center of the slide or near the currently selected shape. If one or more of the previously inserted symbols are selected their appearance will be updated.
An advanced feature is that symbols can also be added to table cells. Once inserted into a cell they will become part of the table and will keep there position inside the table cell. By selecting a range of contiguous cells you can insert/update multiple symbols with a single action.
Symbols inside table cells are only visible if the cell contains text (that’s why Aploris inserts a single space by default). If you delete the text from a cell the symbol will vanish as well.
The commands  Send selected slides and
  Save selected slides provide you with an easy way to manage and share parts of your presentations. To create a copy for sending or saving select all slides that you want to share.
Select Send selected slides from the Aploris’s More menu to prepare an e-mail with the selected slides attached. Aploris will make a suggestion for the file name of the attached file and offers to create a compressed ZIP file. Make changes as required and click  Ok to open a new e-mail in your default e-mail application.
Choosing Save selected slides works similarly and allows you to save the set of selected slides to a new file on your hard disk, a network drive or a portable device.
The following commands support you in creating consistent and pleasing slide designs by helping you to harmonize shape appearances.
Same Height adjusts all selected shapes to match the height of the first selected one. The command Same Height is available from PowerPoint’s Format tab under Drawing Tools when shapes are selected.
Same height gives all shapes the same height and will also adjust the top position for shapes that are within the vertical range of the first selected object.
 →
→
Same Width works exactly as Same Height for aligning shape widths.
Opposed to PowerPoint’s native aligning commands Same Height/Width pays attention to the order in which the shapes were selected. Specifically, the shape that was selected first which will serve as the master for the operation.
Hint: If you want to adjust the heights/widths of many objects you do not need to select them one by one to ensure which will serve as the master shape. Simply select the master shape first, then hold Ctrl and draw a selection frame to select the additional objects. It will not be a problem if the first selected object lies within the selection frame.
The command Same Bevel helps you to match the angles of shapes that use bevels, such as chevrons, pentagons and arrows. It can be found in the Format tab under Drawing Tools when shapes are selected. It is enabled only when two or more shapes are selected and all are supported for adjusting.
 →
→
Just like with same height/width first select the shape that serves as the master, then select the shapes to adjust and execute the command.
Note: Due to geometric limitations it may not be feasible to match the bevels without resizing the shapes. To avoid undesired results Aploris never changes the size of shapes when Same Bevel is used but will adjust the bevel to its limit. If required, resize the shapes and execute the command again.
Horizontal Align and Vertical Align can be used to put a number of shapes on a horizontal or vertical band. This is frequently needed for row or column headers or process flow diagrams.
Horizontal Align will give all selected shapes the same vertical position which is adjusted to the first select shape. Additionally the space between the leftmost and the rightmost shape is evenly distributed. In this regard the command is related to PowerPoint’s built-in command Distribute Horizontally. In addition, Horizontal Align allows you to specify exactly how much space between two neighboring shapes is desired.
In its regular form Horz. Align (found in the Format tab under Drawing Tools tab when shapes are selected) will give all selected shapes the same width. Its companion Align Keep Ratios will preserve the width ratio between the shapes. E.g. a shape that had twice the width of another shape will continue to do so although the absolute width values will usually change. To quickly access these function you can also hold Shift and click on Horz. Align or Vert. Align.
A dialog allows you to specify the desired distance between shapes which will also show an exemplary preview. Negative values are also accepted which may be helpful when aligning a number of chevrons which may technically overlap although visible space remains between two shapes.
Pickup and Apply is a pair of corresponding functions also found in the Format tab (when shapes are selected) or Aploris tab (when charts are selected). They allow you to easily align shapes and charts across slides to avoid “jumping” objects. Additionally, they facilitate switching object positions.
When you select a number of shapes or charts and click on Pickup the positions are stored internally. Once again, Aploris remembers the order in which multiple objects were selected.
Now select objects on a different slide and select Apply which will make those objects move to the same positions as the ones on the first slide.
Position picked up from PowerPoint shapes can also be applied to Aploris charts and vice versa. However, it is not possible to pick up positions from or apply position to PowerPoint shapes and Aploris charts at the same time.
Apply can also be used to quickly change the order of objects. For instance, if you want to reverse the order of four captions, select the objects by their position in reading order (left to right) and click on Pickup. Now unselect the shapes and select them once again in the order in which they are supposed to stand (so right to left in this case), execute Apply to achieve the desired result.
 ↔
↔
By default only the positions of shapes will be modified. However, a variant Apply position and size is available that will also adjust the sizes of objects to match those for which Pickup was used. You can also access this function by holding Shift and clicking on Apply.
Pickup and Apply for tables works similarly to the functions for shape positions. The commands are located in the Layout tab under Table Tools which is visible when a table is selected.
Select an entire PowerPoint table or only those rows or columns for which you want to store the heights/widths. Now select Pickup to let Aploris store the size values internally. Aploris automatically detects if rows or columns were selected and stores either row heights or column widths or both if the entire table was selected.
Continue with selecting another table or even rows and columns in the same table. Click on Apply to make the row heights and/or columns widths match those for which the sizes were picked up.
If the number of rows/columns in the apply range is larger then the pickup range, the picked up values will be applied cyclically. That means that you can for instance pickup the widths of the first two columns and apply them to all following to create a table with two alternating column widths. Or you can pickup the height of a single row and apply it to all rows resulting in a table with equal heights for all rows.
As stated above Aploris detects if row heights or column widths were stored and applies those to the target table. If data for both rows and columns was stored you can use Apply columns width or Apply row heights from the drop-down list to only adjust one of the dimensions.
Note: PowerPoint automatically increases the effective row height if required to accommodate the text in each cell. Even when no text is entered the cell height considers the font size defined for the cell. This means that row heights may be applied (which PowerPoint reports in the Cell Size ribbon group) but are extended by the table content.